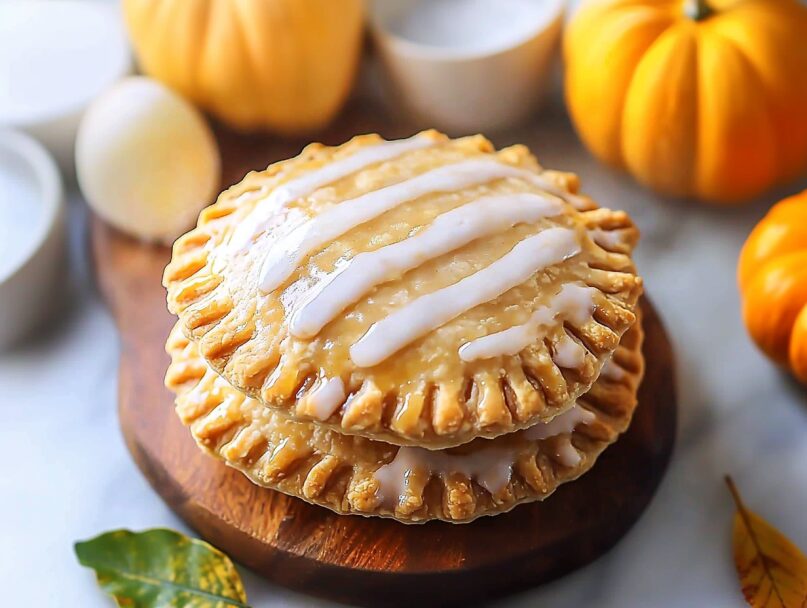
When autumn arrives with its crisp air and colorful leaves, nothing satisfies seasonal cravings quite like these Pumpkin Hand Pies with Maple Glaze. These charming little pastries capture everything you love about traditional pumpkin pie but in an adorable, portable package that fits perfectly in your hand. Imagine biting through a flaky, golden crust to discover a warmly spiced pumpkin filling, all topped with a sweet maple glaze that adds the perfect finishing touch. These hand pies are absolutely irresistible and perfect for fall gatherings, holiday dessert tables, or simply enjoying with your afternoon coffee. #pumpkinseason #falldesserts
The beauty of these hand pies lies not just in their amazing flavor but also in their versatility. They’re portable enough for lunchboxes or picnics, elegant enough for Thanksgiving dessert alternatives, and simple enough for a weeknight treat when you’re craving something special. Plus, using store-bought pie crust means you can have these delicious treats ready to enjoy much faster than a traditional pie!
💡 Why You’ll Love This Recipe
- No need for pie cutting or plates – these hand-held treats are perfect for gatherings
- Store-bought pie crust makes this recipe quick and accessible for bakers of all skill levels
- The maple glaze adds a sophisticated flavor that elevates these beyond regular pumpkin pie
- Perfectly portioned dessert that satisfies your pumpkin pie craving without the commitment of a whole slice
Ingredients Overview
Before you begin making these delightful pumpkin hand pies, let’s take a closer look at what you’ll need:
- 1 can (15 oz) pumpkin purée – Be sure to use pure pumpkin, not pumpkin pie filling
- 1/4 cup sugar – Provides just the right amount of sweetness to complement the pumpkin
- 1 teaspoon pumpkin pie spice – This magical blend of cinnamon, nutmeg, ginger, and cloves creates that classic pumpkin pie flavor
- 1/4 cup heavy cream – Adds richness and creaminess to the filling
- 1 package store-bought pie crust (2 crusts) – Saves time without sacrificing flavor
- 1/2 cup powdered sugar – Forms the base of our luscious maple glaze
- 1 tablespoon maple syrup – Provides authentic maple flavor to the glaze
- 1 tablespoon heavy cream (for glaze) – Creates the perfect drizzling consistency
- 1 egg (for egg wash) – Gives the pies a beautiful golden shine
Tools You’ll Need:
- • Baking sheet
- • Parchment paper
- • Cookie cutter or drinking glass (3-4 inches in diameter)
- • Fork (for crimping edges)
- • Knife or kitchen scissors
- • Pastry brush
- • Medium mixing bowls
- • Whisk or spoon for mixing
Step-by-Step Instructions
Follow these simple steps to create perfect pumpkin hand pies every time:
- Step 1
Preheat your oven to 375°F (190°C). Line a baking sheet with parchment paper to prevent sticking and make cleanup easier. Roll out your store-bought pie crusts on a lightly floured surface. Using a cookie cutter or drinking glass, cut the dough into evenly sized circles or squares, approximately 3-4 inches in diameter. Remember that you’ll need an even number of pieces, as each hand pie requires a top and bottom crust.
- Step 2
In a medium bowl, combine the pumpkin purée, sugar, pumpkin pie spice, and 1/4 cup heavy cream. Mix thoroughly until smooth and well-incorporated. The mixture should have a consistency similar to traditional pumpkin pie filling – thick but still spoonable.
- Step 3
Lay out half of your crust pieces on your work surface. These will form the bottom of your hand pies. Spoon approximately 2 tablespoons of the pumpkin mixture onto the center of each piece, being careful to leave about a 1/2-inch border around the edges. In a small bowl, beat the egg to create an egg wash. Using a pastry brush, brush some egg wash around the edges of each filled crust piece. This will help seal the pies and give them a golden finish when baked.
- Step 4
Place the remaining crust pieces over the filling to create the top of each pie. Gently press down around the edges to seal, being careful not to squeeze out the filling. Using the tines of a fork, crimp all around the edge of each pie to ensure they’re tightly sealed. This not only creates a decorative edge but also prevents the filling from leaking during baking. With a sharp knife, cut 2-3 small slits in the top of each pie to allow steam to escape while baking.
- Step 5
Brush the tops of each pie with more egg wash for a beautiful golden finish. If desired, sprinkle a little extra sugar on top for a sparkling effect. Transfer the prepared hand pies to your parchment-lined baking sheet, spacing them about 1-2 inches apart. Bake in your preheated oven for 15-18 minutes, or until the crust is golden brown and fully cooked. The pies should be evenly browned and slightly puffed up when ready.
- Step 6
While the pies are cooling, prepare your maple glaze. In a small bowl, whisk together the powdered sugar, maple syrup, and 1 tablespoon of heavy cream until smooth and pourable. If the glaze seems too thick, add a tiny bit more cream, just a teaspoon at a time, until you reach the perfect drizzling consistency. Once the hand pies have cooled slightly (about 5-10 minutes), use a spoon to drizzle the maple glaze over each pie. Allow the glaze to set for a few minutes before serving.
Recipe Notes:
- Ensure the edges are sealed properly to avoid filling leakage during baking. Press firmly with the fork all around the edges.
- Don’t overfill the pies! Two tablespoons is the perfect amount – too much filling will make the pies difficult to seal and more likely to leak.
- Be sure to create steam vents in the top crust to prevent the pies from bursting during baking.
Tips and Tricks for Perfect Hand Pies
Creating hand pies that are both beautiful and delicious requires a few insider tips:
Keep Everything Cold
Work with cold pie dough for best results. If your kitchen is warm or you’re working slowly, place the cut dough circles in the refrigerator while preparing the filling. Cold dough produces flakier crusts.
Proper Sealing Technique
The seal between the top and bottom crusts is crucial. Apply egg wash generously around the borders and press firmly with a fork. For an even stronger seal, you can press with your fingers first, then follow with fork crimping.
Getting the Filling Just Right
For the perfect pumpkin filling consistency, make sure your pumpkin purée is well drained. If it seems too watery, place it in a fine-mesh sieve lined with a coffee filter or paper towel for 30 minutes to remove excess moisture.
Glaze Consistency
The maple glaze should be thick enough to stay on the pies but thin enough to drizzle. If it’s too thin, add more powdered sugar; if too thick, add tiny amounts of cream. For the most attractive presentation, use a fork or a small whisk for drizzling rather than a spoon.
Delicious Variations
Once you’ve mastered the basic recipe, try these creative variations:
Pumpkin Cheesecake Hand Pies
Add 2 ounces of softened cream cheese to your pumpkin filling for a tangy, cheesecake-like twist. Blend thoroughly until smooth before filling the pies.
Spiced Pecan Crunch
Before baking, sprinkle the tops of the egg-washed pies with a mixture of finely chopped pecans, brown sugar, and a pinch of cinnamon for added texture and flavor.
Apple Pumpkin Fusion
Add 1/4 cup of finely diced apple to your pumpkin filling for a delightful textural contrast. Use firm apples like Granny Smith or Honeycrisp that will hold their shape during baking.
Chocolate Drizzle
After applying the maple glaze, add a light drizzle of melted chocolate for an indulgent finish that appeals to chocolate lovers.
Mini Pumpkin Empanadas
Fold the dough into half-moon shapes instead of using separate top and bottom pieces. Use a fork to crimp the edges and create a traditional empanada look.
Storage & Reheating
These pumpkin hand pies store beautifully, making them perfect for advance preparation:
Room Temperature: Store glazed hand pies in an airtight container at room temperature for up to 2 days. Place parchment paper between layers if stacking.
Refrigerator: For longer storage, keep in the refrigerator for up to 5 days. Allow them to come to room temperature before serving for best flavor.
Freezer: Unglazed hand pies freeze exceptionally well for up to 3 months. Wrap each pie individually in plastic wrap, then store in a freezer bag. Thaw overnight in the refrigerator and glaze before serving.
Reheating: To restore freshness, warm the pies in a 350°F (175°C) oven for 5-7 minutes until heated through. For a quicker option, microwave on 50% power for 20-30 seconds, though this may slightly soften the crust.
Frequently Asked Questions
Can I make these hand pies ahead of time?
Yes! You can prepare the hand pies up to the point of baking, then freeze them uncooked. When ready to bake, brush with egg wash and bake directly from frozen, adding an extra 5-7 minutes to the baking time. Alternatively, bake them completely, allow to cool, and freeze in an airtight container without the glaze. Thaw and add fresh glaze before serving.
Can I use homemade pie crust instead of store-bought?
Absolutely! Homemade pie crust will make these hand pies even more delicious. Use your favorite recipe, roll it to about 1/8-inch thickness, and proceed with the recipe as written.
How do I know if the hand pies are done baking?
The pies are done when the crust is golden brown across the top and bottom. If you’re uncertain, you can lift one carefully with a spatula to check that the bottom is not soggy. The filling should be bubbling slightly through the vents.
Why did my filling leak out during baking?
Leakage typically happens when pies aren’t sealed properly or are overfilled. Be sure to use only about 2 tablespoons of filling per pie, create a good seal with egg wash, and crimp firmly with a fork. Also, don’t forget those steam vents in the top crust!
Can I use a different type of glaze?
Yes! While the maple glaze complements the pumpkin flavor beautifully, you can also try a simple vanilla glaze (powdered sugar, vanilla extract, and milk), a cream cheese glaze, or even a cinnamon-spiced glaze by adding a pinch of cinnamon to the maple glaze recipe.
I absolutely adore making these pumpkin hand pies each fall! There’s something so satisfying about creating these little pockets of pumpkin perfection. I first started making them for my daughter’s fall school bake sale, and they were such a hit that they’ve become a seasonal tradition in our house. My personal twist is adding just a tiny pinch of cardamom to the pumpkin filling – it adds a subtle complexity that makes people wonder what that “something special” is. I also love to make a double batch and freeze half of them unglazed – there’s nothing better than being able to pop a few in the oven when unexpected guests arrive or when I’m craving a taste of fall on a busy weeknight. The maple glaze really is the crowning glory here, so don’t skimp on using real maple syrup! I’d love to hear if you try these pies and what variations you come up with!
Pumpkin Hand Pies with Maple Glaze
Perfect portable pumpkin treats with a sweet maple glaze – all the flavors of pumpkin pie in a handheld package!
- 1 1 can (15 oz) pumpkin purée
- 2 1/4 cup sugar
- 3 1 teaspoon pumpkin pie spice
- 4 1/4 cup heavy cream
- 5 1 package store-bought pie crust (2 crusts)
- 6 1/2 cup powdered sugar
- 7 1 tablespoon maple syrup
- 8 1 tablespoon heavy cream (for glaze)
- 9 1 egg (for egg wash)
- 1 Preheat the oven to 375°F. Roll out the pie crusts and cut them into circles or squares.
- 2 In a bowl, mix the pumpkin purée, sugar, pumpkin pie spice, and 1/4 cup heavy cream until smooth.
- 3 Spoon 2 tablespoons of the pumpkin mixture onto each crust piece. Brush some of the egg wash around the edges and place another piece of pie crust on top.
- 4 Seal the edges by pressing down with a fork, and make small slits in the center of the pies using a knife.
- 5 Brush the pies with the beaten egg and sprinkle some extra sugar on top. Place the hand pies on a parchment-lined baking sheet and bake for 15-18 minutes until golden brown.
- 6 In a small bowl, whisk together powdered sugar, maple syrup, and 1-2 teaspoons of heavy cream to form the glaze. Drizzle the maple glaze over the hand pies after they have cooled slightly.
- 1 Ensure the edges are sealed properly to avoid filling leakage during baking.
- 2 For a decorative touch, use cookie cutters in festive fall shapes like pumpkins or leaves.
- 3 These hand pies can be frozen before baking – just add 5-7 minutes to the baking time if baking from frozen.

